
All articles [ Engineering ] N° 02 / 16 Jour J 9 min read // Lire en français
Replaying our demo at home: the full chain on an emulator
Step-by-step tutorial to replay the OC2-Edge demo on an emulator: Secure Boot with OVMF, swtpm software TPM, signed UKI image, fault injection without cascade, A/B update with rollback, and the COP in a browser.
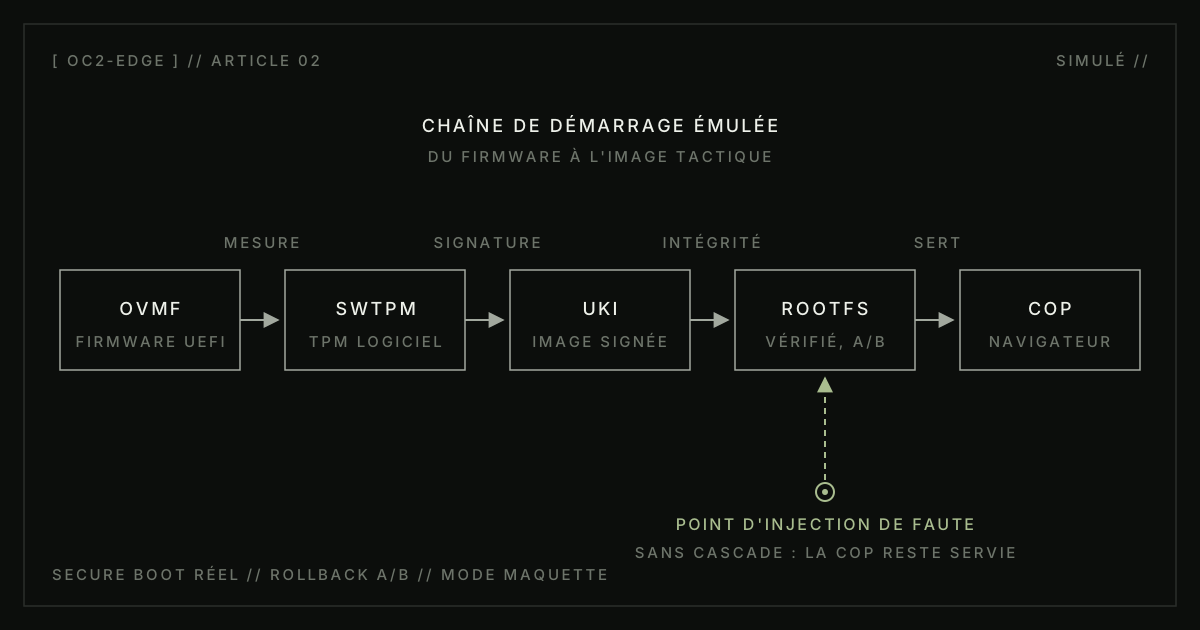
A demonstration that only the vendor can run proves nothing. The OC2-Edge demo therefore replays on your machine, on an emulator, without dedicated hardware. This article describes the full procedure: from cloning the repository to an emulated node that boots with real Secure Boot, installs a signed module, absorbs an injected fault without cascade, applies an A/B update with automatic rollback, and feeds a COP (Common Operational Picture, the shared tactical picture) in your browser.
The word “real” has a precise meaning here. The emulator does not simulate Secure Boot: it executes it. The UEFI (Unified Extensible Firmware Interface) firmware is OVMF, the open source firmware from TianoCore’s EDK II project [1]. It enforces the signature verification defined by the UEFI specification [4], exactly as an embedded computer’s firmware would. The TPM (Trusted Platform Module) is swtpm, a complete software implementation of the TPM 2.0 interface [2]. The cryptographic chain that rejects a tampered image on your machine is the same one that would reject it on a physical target. Only the silicon differs.
What the demo shows
The scenario covers five behaviors, in order:
- verified boot: OVMF validates the signature of the UKI (Unified Kernel Image, a unified image bundling kernel, initrd and command line into a single signed UEFI binary [3]), then the system verifies the integrity of the rootfs;
- signed module installation: the node verifies the ML-DSA-65 (FIPS 204) signature of the package before running it in its sandbox;
- injected fault: a module receives a forced crash; supervision confines it and restarts it, while the other modules and the COP keep serving;
- A/B update: the node switches to a deliberately defective update image, fails to validate it at boot, and returns on its own to the healthy partition;
- COP: the browser displays the tactical picture served by the node, in explicit MOCK mode (simulated data, never presented as real).
Honest prerequisites
The demo runs on Linux or on Windows through WSL2 (Windows Subsystem for Linux, version 2). The following requirements are orders of magnitude, not measured minimums:
- an x86-64 processor with hardware virtualization enabled (VT-x or AMD-V); without it, QEMU [5] runs in pure emulation, which is much slower;
- on the order of 8 GB of free RAM, of which about 4 GB are allocated to the emulated node (indicative value);
- on the order of 20 GB of disk space for the repository, the images and the build artifacts (indicative value);
- a first full run on the order of 30 to 60 minutes, downloads and image preparation included (indicative value, dependent on machine and network); subsequent runs are much shorter.
Required host packages: qemu-system-x86_64, swtpm, git, make and a POSIX shell environment. The verification script in step 1 checks for their presence. Under WSL2, nested virtualization must be active; the same script checks it.
Step 1: clone the repository and check the environment
Note:
<URL_DU_DEPOT>stands for the public URL of the OC2-Edge repository, available from the Open Source section of the site. It is not reproduced here so that this tutorial remains valid if the repository changes hosting.
git clone <URL_DU_DEPOT> oc2-edge
cd oc2-edge
./scripts/check-env.sh
The check-env.sh script verifies the required binaries, hardware virtualization and disk space. It stops with an explicit message at the first missing prerequisite. Do not continue until it completes without error: every following step assumes a validated environment.
Step 2: prepare the firmware and the demonstration keys
make demo-prepareThis target does three things:
- it fetches the OVMF binaries with Secure Boot enabled (the
secbootvariant of EDK II [1]); - it generates a demonstration key hierarchy (PK, KEK, db, in the sense of the UEFI specification [4]) and enrolls it in a local copy of the firmware variables;
- it builds or fetches the node image: a UKI signed with the demonstration key, and an immutable rootfs whose hash tree is sealed into the UKI.
Important point: the demonstration keys are generated locally, on your machine, at each preparation. They protect nothing and must protect nothing. The project’s real key management (offline root keys, ML-DSA-65 signatures) is covered by separate documentation in the repository; the demo reproduces its topology, not its secrets.
Step 3: start the software TPM
mkdir -p ./run/tpm
swtpm socket --tpm2 \
  --tpmstate dir=./run/tpm \
  --ctrl type=unixio,path=./run/tpm/swtpm.sock \
  --daemon
swtpm exposes a complete TPM 2.0 on a local socket [2]. QEMU connects to it and presents it to the guest system as a hardware TPM. The emulated node uses it as a physical node would: measurement of the boot chain into the PCRs (Platform Configuration Registers), sealing of state to those measurements. If you use the make demo-boot target from the next step, this launch is done for you; the command is given here to show that there is nothing else behind it.
Step 4: boot the node with Secure Boot
make demo-bootThe target wraps a QEMU invocation of the following form (paths simplified):
qemu-system-x86_64 \
  -machine q35,smm=on -m 4G \
  -drive if=pflash,format=raw,readonly=on,file=./out/OVMF_CODE.secboot.fd \
  -drive if=pflash,format=raw,file=./out/OVMF_VARS.demo.fd \
  -chardev socket,id=chrtpm,path=./run/tpm/swtpm.sock \
  -tpmdev emulator,id=tpm0,chardev=chrtpm \
  -device tpm-tis,tpmdev=tpm0 \
  -drive file=./out/oc2-node.img,format=raw \
  -netdev user,id=n0,hostfwd=tcp::8443-:443 \
  -device virtio-net-pci,netdev=n0
Expected sequence: OVMF starts, verifies the UKI signature against the db database enrolled in step 2, then hands control to the UKI’s UEFI stub (systemd-stub [6]), which measures its components into the TPM before launching the kernel. The system then mounts the rootfs read-only and verifies its integrity block by block against the hash tree sealed into the UKI. The node then reaches its nominal state. The serial console shows the progression; the node state can also be read through the control command:
./scripts/oc2ctl statusThe expected state is a node in nominal posture, partition A active, no third-party module loaded.
Step 5: install a signed module
./scripts/oc2ctl module install ./out/modules/demo-tracker.oc2pkg
./scripts/oc2ctl module list
The node verifies the ML-DSA-65 (FIPS 204) signature of the package, checks that the signing key appears in the instance’s trust policy, then starts the module in its isolation environment (namespaces, cgroups, seccomp filter; article no. 5 details these layers [see /en/blog/mille-crashs-par-nuit/]). The module list must show the module in active state, with the identity of its signing key.
Step 6: inject a fault, observe the absence of cascade
./scripts/oc2ctl fault inject --module demo-tracker --kind crash
./scripts/oc2ctl status --watch
Expected behavior, with no other intervention: the module enters a failed state, supervision logs the event, confines the failure to the module’s perimeter and restarts it according to its policy. Throughout the sequence, the node’s other services and the COP remain reachable. This is the behavior whose systematic verification article no. 5 describes: the anti-cascade property is not an intention, it is a requirement tested every night.
Step 7: A/B update and automatic rollback
make demo-update-rollbackThe scenario applies to partition B an update image built to fail its validation. The node reboots on B, observes the verified boot failure, counts down its attempts and switches back on its own to the healthy partition A. Expected behavior: after the sequence, oc2ctl status shows partition A active and a rollback event in the log. No manual intervention is required; that is the point of the mechanism. Distribution of real updates goes through a TUF repository (The Update Framework [7]), which protects the update metadata itself; the demo uses a local TUF repository.
Step 8: open the COP
./scripts/oc2ctl cop urlThe command prints the local URL of the COP (by default on the port forwarded in step 4). Open it in a standard browser: no heavy client, no extension. The COP starts in MOCK mode, displayed on screen at all times: the visible tracks are simulated and presented as such. LIVE mode exists in the product but makes no sense on a demonstration node without sensors.
Breaking the chain on purpose
A chain of trust is judged by what it refuses. The repository provides sabotage targets; each one modifies an artifact, reruns the scenario and lets you observe the refusal. The behaviors described below are the expected behaviors; the exact messages depend on the firmware and system versions, and are not reproduced here.
Tampered UKI.
make sabotage-uki
make demo-boot
The target flips bytes in the signed UKI. Expected behavior: OVMF refuses to execute the binary, whose signature no longer matches its content [4]. The node does not boot; there is no “booted but doubtful” state on this path. Recovery goes through make demo-prepare.
Modified rootfs.
make sabotage-rootfs
make demo-boot
The target modifies blocks of the rootfs without touching the UKI. The UKI signature remains valid, the boot begins, then the rootfs integrity verification detects the divergence between the blocks read and the sealed hash tree. Expected behavior: the node refuses the nominal state and adopts a degraded posture defined by its policy, in which it reports the integrity breach instead of serving data from a suspect filesystem.
Forged package.
make sabotage-package
./scripts/oc2ctl module install ./out/modules/demo-tracker.oc2pkg
The target modifies the module package after signing. Expected behavior: the ML-DSA-65 verification fails, the node rejects the installation, logs the rejection and loads nothing. The forged package never reaches the execution environment.
Limits of emulation
The demo proves the logical and cryptographic chain, not performance nor behavior on silicon. Boot times measured under QEMU commit to nothing for an embedded target. The project covers x86-64 and ARM64 emulation; the Jetson campaign is tooled but has not yet produced silicon results, and the repository states this as is. Every behavior described in this article corresponds to an automated test in the public repository (~930 tests passing): if your run diverges from the description, one of the two is wrong, and that is called a welcome bug report.
Sources
- TianoCore, “EDK II” (OVMF, OvmfPkg package), https://github.com/tianocore/edk2
- S. Berger, “swtpm: Software TPM Emulator”, https://github.com/stefanberger/swtpm
- UAPI Group, “UAPI.5 Unified Kernel Images”, https://uapi-group.org/specifications/specs/unified_kernel_image/
- UEFI Forum, “UEFI Specification”, https://uefi.org/specifications
- QEMU Project, “QEMU Documentation”, https://www.qemu.org/docs/master/
- freedesktop.org, “systemd-stub”, https://www.freedesktop.org/software/systemd/man/latest/systemd-stub.html
- The Update Framework, “TUF Specification”, https://theupdateframework.io/